
There are 4 stages I go through when I’m condemned to do a repetitive task, like filling in and submitting hundreds of online forms. Stage 1 is hope, that it won’t be all that tedious. After all, isn’t life what you make it?
After the first few are done, hope is crushed and I move into phase 2 – the despair phase. Doing those first few sucked and I just projected that out into the future, multiplied by 200. But my fate is sealed so I push on.
Now I’ve done 15 and I’m starting to perversely enjoy it. This is the simple joy phase, in which my world shrinks and my mission as a human being becomes solely to add these manager emails to the correct local listings profile. No more bills to pay, no nothing – some might call it a peak meditative state.
But it couldn’t last. Sharply I arrive at stage 4 – searing hand pain. I’m at #42.
It doesn’t have to be this way. In an alternate universe, other me is doing something more interesting while his computer is doing the boring task of updating site manager emails, all on its own. Click here to see it in action.

Chrome Can Be Your Robot Slave
Did you know that Google Chrome can be automated? Anything you can do on web pages in the browser can also be programmed to happen in a sequence you choose or based on triggers. There is a special version of Chrome designed for this, which can be most powerfully controlled by scripts in languages such as Python, but that’s not the only way to do it. There is a tool you can download for free which opens this up to the non-coder. If you are halfway good at setting up newly purchased consumer electronic equipment, you should be fine with this tool. So what is it?
SeeShell is a free browser that you download. It takes your instructions and robotically carries them out on any list of URLs that you provide. Or, it can record any repetitive browser task you do and attempt to replicate it. The learning curve is far lower than for coding, but the results are similar in power. Here’s the working example encase you missed it.
SeeShell Automated Browser Overview
On the left you’ve got a normal looking browser display. On the right, there’s a list of pre-recorded automation sequences to show you examples of what the browser can do and how to try to replicate this for your own needs. What you will eventually do is make your own automation sequence.
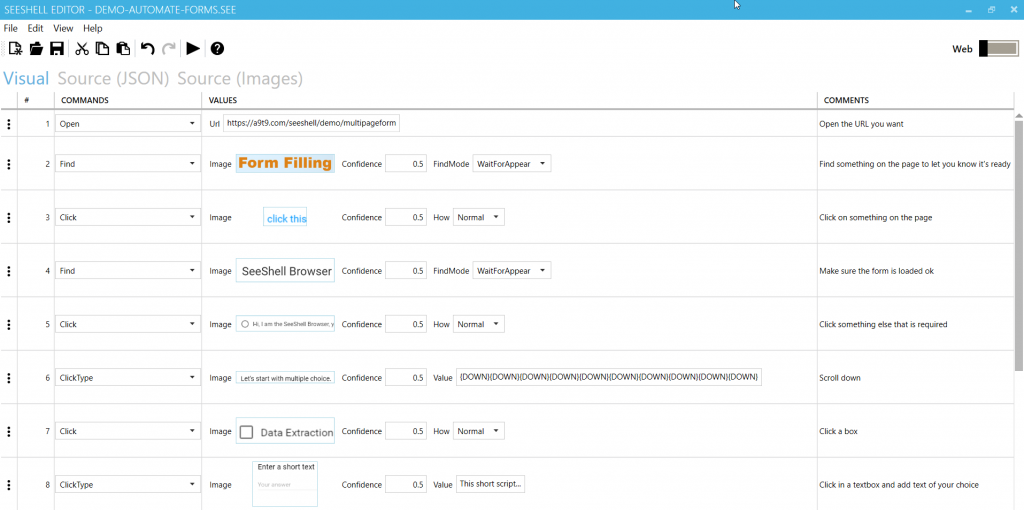
If I click on one of those Demos, I see the above – a list of sequenced steps detailing actions and the conditions for those actions. To run through the first few steps in the example above:
- Open a URL which I have entered – easy.
- Scan for an image match on the page to check if it’s all loaded.
- Click an image on the page.
- Do whatever else is needed.
There are many possible actions you can program in. For example, you can get the browser to visit a list of pages and capture specific text.
Image Matching Technology
The core principle of SeeShell and what gives it its power is the image matching technology. You take a handy screenshot of what you want to click on, in the style of the Windows snipping tool, and it remembers what it’s looking for. It will try to click on that thing when it sees it, or do another action you require.
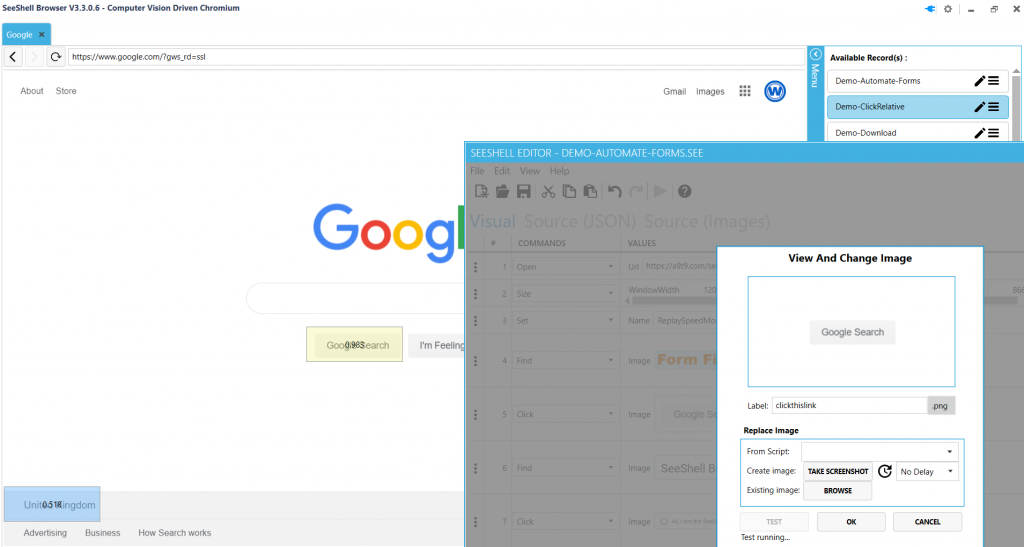
This is the essence of how you automate using this tool – select an action from the dropdown list, and tie it to a feature of the page using the image matching. There are lots of other ways of nailing down an area of a page, but this is the core one.
Looping Through a List
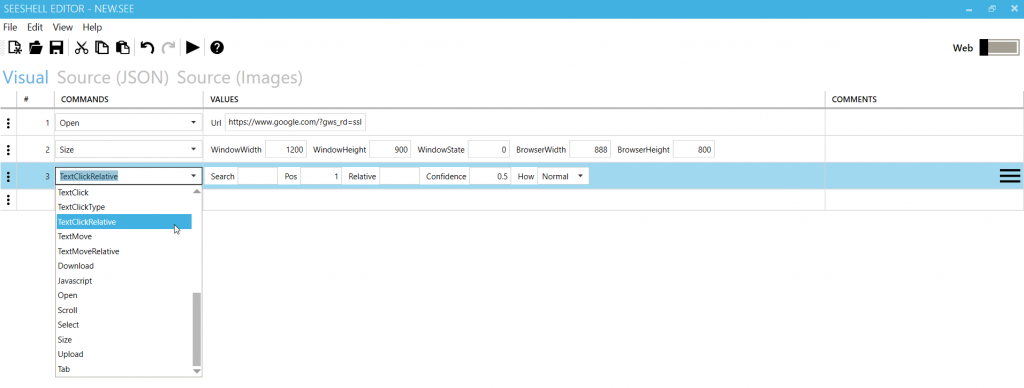
So you’ve made your first automated sequence, and it worked! But you had to put the URL in yourself manually. You’ve got a list of thousands that need to be done! This is where the CSV file reading functionality comes in. It’s slightly trickier than what we have covered so far, but pretty easy once you know it.
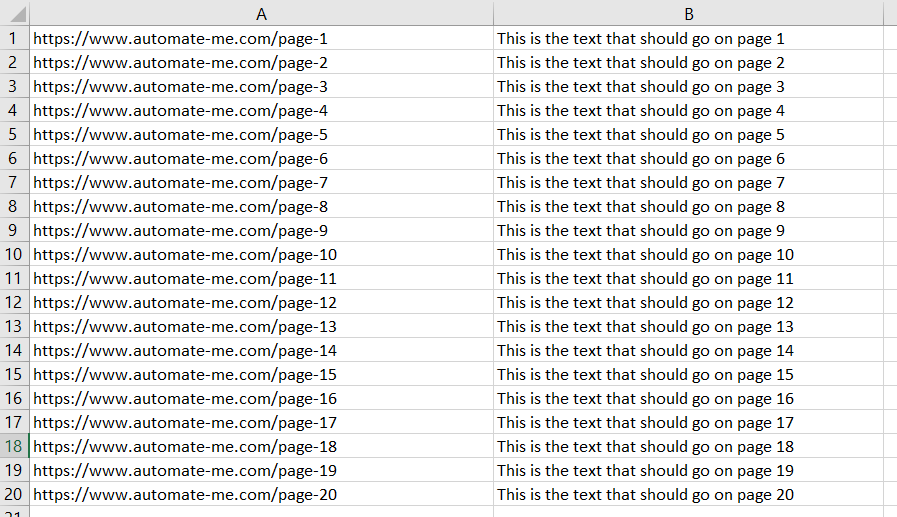
Let’s say you want the browser to visit automate-me.com/page-1, enter ‘page 1 confirmed’ into the text box and click submit, then load up automate-me.com/page-2 and enter ‘page 2 confirmed’. So there is different text which needs to be entered, depending on the page you are on. No worries – just make a .csv file with the URLs in the left column and the text you want added in the column next to it.
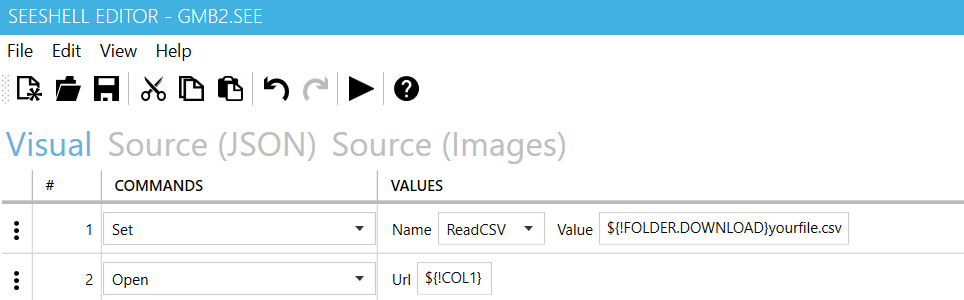
Next, tell the tool where to look for the file to loop through.
- There will be a place on your hard drive where it will look for files. On my install, it was at C:UsersRichard.LewisDocumentsSeeShell.Browserdownload.
- In your automated program, select the ‘Set’ option and choose ‘ReadCSV’ in the name dropdown, next to it.
- Next along, in ‘value’, enter this: ${!FOLDER.DOWNLOAD}yourfile.csv, replacing ‘yourfile.csv’ with your full csv file name
Now it knows where your file is. Next, tell it how to use your file on each loop. This has 2 parts – 1) opening the URL, and 2) adding the correct text for the URL.
- Create another action step, this time selecting ‘Open’ as we will be using it to open the URLs in your csv file.
- Fill in the url as ${!COL1}, this tells the tool to try to open whatever URL is in column 1 of your csv file, and you can change this column number to anything you like
Following on from this, at the appropriate point in the sequence, add the step which gets the text to be added in the csv, and place it where it needs to go on the page.
- Select ‘clicktype’ as you want the tool to click on a location based on an image match, and then type something in.
- Set the image.
- For value, like we did above, enter
${!COL2} to indicate the column the text will be taken from. This ensures the right text gets input on the right page.

To set it all in motion, save your automated program and click ‘Play Loop’ on the main browser interface. Then comes the fun part – watching it do your work for you while you do something else. Here’s that working example again.
The most important thing is knowing which tasks to automate and which to just do
I recently added 930 site manager emails to Google My Business for a local SEO client. This was a task that it was worth automating. Creating the automation sequence took me an hour or two, and looking after it took what was effectively another hour. So that’s 2-3 hours of engaging and stimulating work, vs. 6 hours of tedium.
Doing your own web automation doesn’t make your work go away completely, but it does turn long, boring tasks into shorter, more interesting ones.
If I’d had 100 to add, it wouldn’t have been worth the time to make the automation sequence. I would have been better off doing it manually. When deciding whether to invest time and energy in creating an automation sequence, I look at the following:
- Will it take me more than 2 hours of drudgery to do the task manually?
- Could this task come up again?
If yes to both, you can start having fun making your automation sequence. If no, prepare yourself to experience the hope, despair, joy and searing hand pain (in that order) of manual completion.
Found is a London-based multi-award-winning digital growth, SEO, PPC, Social and Digital PR agency that harnesses the efficiencies of data and technology and future-thinking to help clients grow their businesses online.

